In this tutorial post we will demonstrate how to create 3 tier
architecture using asp.net c#. Three tier architecture means dividing
our project into three layers that is presentation layer (UI layer),
Business Layer (Logic code layer) and datalayer (Layer which connects to
database).
Many developers via emails ask me, how to implement three tier architecture in their application. There are lots of mails coming every day now and then asking for 3 tier architecture implementation. So this post is especially for those developers who are looking to develop a 3 tier implementation in their projects. Three tier architecture means dividing project in three layers User Interface Layer, Business Layer and Data Layer where we separate logic,data and user interface in three division. It means tomorrow if we replace sql server database with oracle database then we need to change only data layer OR if we change or user screen from windows application to website then we need to change only our user interface layer rest everything remain the same.
Kindly Note : Developer or coder need to be well versed with use of classes and objects in c-sharp.
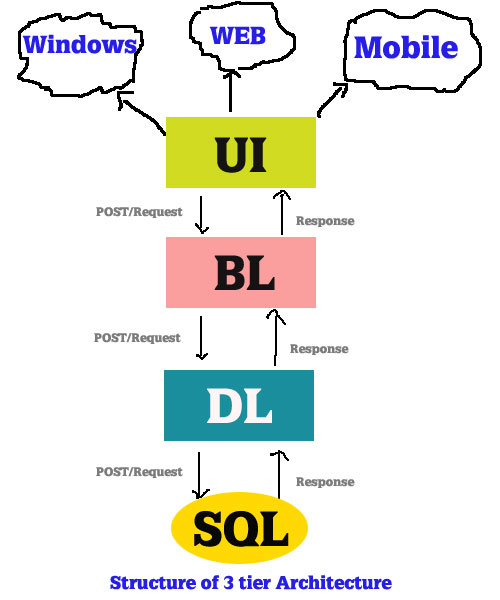
How it works
Presentation layer is your user interface layer where you can design your interface using html web controls or windows controls or mobile controls. It can be your website or windows application or mobile application.This layer only communicates with business layer.
Application layer or Business Layer is the middle layer or bridge layer that connects database layer and presentation layer. In this layer you can write your business logic (logic written as per business requirement) or any validation code.This layer communicates with database layer and presentation layer.
Database layer which makes the connection to the database server. In this layer you can write database connection and sql queries or stored procedures. This layer only communicates with business layer.
When user post any data from from user interface (presentation page), data first goes to the business layer there data will be validated then validated data is posted to database layer to insert into the database.
When user request any data from the database then the request is first processed by the business layer validates the request and sends to database layer then database layer forwards it to the database server and fetches necessary records. Found records are loaded by the database layer and passes it back to the business layer then business layer passes those records to the presentation layer.
Migration to new graphical environments is faster.
As each tier is independent it is possible to enable parallel development of each tier by using different sets of developers.
Easy to maintain and understand large project and complex project.
Since application layer is between the database layer and presentation layer so the database layer will be more secured and client will not have direct access to the database.
Posted data from presentation layer can be verified or validated at application layer before updating it to the database.
Database Security can be provided at application layer.
Application layer or middle layer or business layer can be a protection shield to the database.
New rules or new validation rules can be defined any time and changes made to middle layer will not effect presentation layer.
Define any logic once within the business layer and that logic can be shared among any number of components in the presentation layer.
We can display only necessary methods from business layer in the presentation layer.
We can hide unnecessary methods from business layer in the presentation layer.
Easy to apply object oriented concept
Easy to update data provider queries.
Need good expertise in object oriented concept (classes and objects).
It is more complex to build.
Difficult to understand : If a new developer joins you for the same project then it becomes very difficult to make him/her understand about the code and project (inspite of having documentation).
No proper templatization : It becomes very difficult to find any specific part of project code.
Security Threat : Our database server is not secured because database server code is directly written in the page level.
We are human beings we cannot remember all those codes which we have written in the different pages over the years (Large projects). So in order to maintain flexibility, migration facility, data security, proper maintenance and to understand project easily even after the years it is best practices to use 3 tier architecture in projects.
For small projects with 5 to 20 screens it is not necessary to implement three tier architecture. But for large projects it is recommended to use three tier implementation.
Step 1 : Create Presentation Layer
We will create a website for our presentation layer.

As you see from above code that we have successfully created a website with dotnet framework 4.0 and language c#.
In our website screen we have created a customer entry screen to add a new customer to the data base means using this screen we will see how to post data over 3 tier architecture and update it in the database.
Then we have added a gridview to the screen to display all customers from the data base means using gridview screen we will see how to fetch all records from the database and display it on screen with edit and delete options.

In the same gridview we provided two options "edit" and "delete" to edit and delete selected customer records. Kindly Note : If you want to know more about insert, update, delete and select in asp.net c# then click here to view my article.
"Edit" option provided to see how to fetch selected customer ID record from database over 3 layers. "Delete" option provided to see how to delete selected customer ID record from database over 3 layers.
So this is how our presentation layer looks like now we will create our database layer and start our coding from database layer->Business Layer->Presentation Layer.
Step 2 : Create Database Layer
In this step we will add a new project of class library to our existing project and name it as database layer.

As you see from our above code that we have successfully created our database layer.
Step 3 : Create a connection to Data Provider
In our web application we will use SQL SERVER as our data provider so lets make a connection to sql server. For best practices we will write our sql connection string in the web config file. As we know that web config is the configuration file for web applications so if we write sql connection in that file we can access sql connection string from any file in the project.
So as you see from above code that we have successfully added connection string "Mythreetier" to web config file. Now lets call that sql connection string in database layer file.
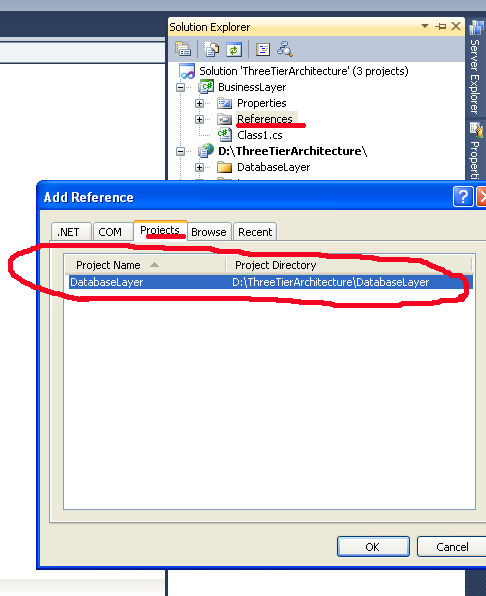
To call connection string from web config file to database layer, manually we need to add references of System.Configuration to database layer references folder as shown in below image file.

We also need to import data references in the database layer file and finally calling connection string "Mythreetier" in database layer file as shown below code.
Step 4 : Create SQL Methods
Now in this step we will create methods which will execute Insert/Update/Delete command using SQLCOMMAND and another method which execute Select command using SQLCOMMAND and DATASET to load all records and pass it to business layer.
As you see from our above code that we have created two following methods "InsertUpdateDeleteSQLString()" to execute Insert/Update/Delete and "ExecuteSqlString()" to execute Select command.
Before we create methods for insert/update/delete/select sql queries let me just show you how our "customer" table structure in sql database looks like.

Now lets create methods for insert/update/delete/select sql queries as shown below.
Note : Above code is Complete Database Layer Code.
This is the complete code of database layer file as you see from above code that we have created different methods for insert/update/delete/select sql queries. Now these are the methods which will used in the business layer for customer insert, update, delete and select.
Step 5 : Create Business Layer
In this step we will add a new project of class library to our existing project and name it as business layer.

As you see from our above code that we have successfully created our business layer.
Step 6 : Import Datalayer Namespace in Business Layer
In this step we need to import the namespace of database layer and then create the object of class "clsDatalayer" as shown below code. To import the namespace manually we need to add database layer project references in the business layer references folder. as shown below.
After adding the references we need to create a database layer class object in the business layer class.
Now in further step we will create methods in business layer for
select/update/delete/insert to update from presentation layer to
database layer.
Note : Above code is the complete snippet foor business layer.
So as you see from above code that we have successfully created each methods for select/insert/delete/update i.e.
For Select : LoadCustomer();
For Insert : AddNewCustomer();
For Update : UpdateCustomer();
For Delete : DeleteCustomer();
So our business layer and datalayer is now ready to take input values from presentation layer.
If you see closely look without touching user interface we have coded our business logic and database logic so tommorow if our user interface changes from web application to mobile application then our business logic and database logic remains the same because our business layer and database layer are not coupled with user-interface layer.
So friends as you see this is one of the main advantage of using 3 tier architecture in projects because it gives you more flexibility to handle projects over a time period if any user-interface comes or any code migration happens then we can handle them easily without changing our database layer and business layer snippet only we need to re-code our user-interface pages.
Step 7 : Passing Values to Business Layer
Finally we will now code our presentation layer. First we need to reference business layer project in the website application references folder and import the namespace of business layer.


As you see from above code that we have successfully imported the
namespace in the presentation layer. Now lets do
select/insert/update/delete using Business layer methods.
Select Customer
Now lets load all the customers in the Gridview using LoadCustomer() method.

As you see from above image we have displayed all customer records in the gridview using LoadCustomer() method.
Insert Customer Record
We will insert the customer record and to insert we will use AddNewCustomer() method in the button click event and pass appropriate values to it.
Note : HiddenField is by default empty when the user
clicks on edit link then we have set the HiddenField value with the
customer ID but by default it is empty.
Update Customer
When the user from the screen clicks on edit link which is located on gridview then on GridView1_SelectedIndexChanging() event we have set all the values to text fields as shown below.

If the hiddenfield contains the value and user clicks on update button then we used UpdateCustomer() method to update the records to the database as shown in below code.
Delete Customer
When the user clicks on delete link located on gridview then on GridView1_RowDeleting() click event we have called DeleteCustomer() method to delete a record as shown in below code.
Complete Code of Presentation Layer is shown below
So friends i hope you understood this complete tutorial on Three Tier Architecture in ASP.NET using c# language.
Many developers via emails ask me, how to implement three tier architecture in their application. There are lots of mails coming every day now and then asking for 3 tier architecture implementation. So this post is especially for those developers who are looking to develop a 3 tier implementation in their projects. Three tier architecture means dividing project in three layers User Interface Layer, Business Layer and Data Layer where we separate logic,data and user interface in three division. It means tomorrow if we replace sql server database with oracle database then we need to change only data layer OR if we change or user screen from windows application to website then we need to change only our user interface layer rest everything remain the same.
Kindly Note : Developer or coder need to be well versed with use of classes and objects in c-sharp.
How it works
Presentation layer is your user interface layer where you can design your interface using html web controls or windows controls or mobile controls. It can be your website or windows application or mobile application.This layer only communicates with business layer.
Application layer or Business Layer is the middle layer or bridge layer that connects database layer and presentation layer. In this layer you can write your business logic (logic written as per business requirement) or any validation code.This layer communicates with database layer and presentation layer.
Database layer which makes the connection to the database server. In this layer you can write database connection and sql queries or stored procedures. This layer only communicates with business layer.
When user post any data from from user interface (presentation page), data first goes to the business layer there data will be validated then validated data is posted to database layer to insert into the database.
When user request any data from the database then the request is first processed by the business layer validates the request and sends to database layer then database layer forwards it to the database server and fetches necessary records. Found records are loaded by the database layer and passes it back to the business layer then business layer passes those records to the presentation layer.
Advantages of using 3 tier architecture
It makes the logical separation between business layer and presentation layer and database layer.Migration to new graphical environments is faster.
As each tier is independent it is possible to enable parallel development of each tier by using different sets of developers.
Easy to maintain and understand large project and complex project.
Since application layer is between the database layer and presentation layer so the database layer will be more secured and client will not have direct access to the database.
Posted data from presentation layer can be verified or validated at application layer before updating it to the database.
Database Security can be provided at application layer.
Application layer or middle layer or business layer can be a protection shield to the database.
New rules or new validation rules can be defined any time and changes made to middle layer will not effect presentation layer.
Define any logic once within the business layer and that logic can be shared among any number of components in the presentation layer.
We can display only necessary methods from business layer in the presentation layer.
We can hide unnecessary methods from business layer in the presentation layer.
Easy to apply object oriented concept
Easy to update data provider queries.
Disadvantage of using 3 tier architecture
Time consuming : To implement even small part of application it will consume lots of time.Need good expertise in object oriented concept (classes and objects).
It is more complex to build.
Why to use 3 tier architecture in projects
To Manage Large Projects becomes difficult : Lets suppose you have created a 1000 screen project without using 3 tier architecture and coded all codes in the presentation layer then suppose over period of time you want to migrate to windows to web application then again you need to write code for all 1000 screens OR lets suppose tomorrow you database provider changes from sql server to oracle server then again where ever you have written sql connection in all 1000 screens in all that you need to make changes. Frankly speaking changing code in 1000 screens or re-writing code in 1000 screens is not easy it is time and money consuming job because your client or company will not pay that much or give that much time to code every time.Difficult to understand : If a new developer joins you for the same project then it becomes very difficult to make him/her understand about the code and project (inspite of having documentation).
No proper templatization : It becomes very difficult to find any specific part of project code.
Security Threat : Our database server is not secured because database server code is directly written in the page level.
We are human beings we cannot remember all those codes which we have written in the different pages over the years (Large projects). So in order to maintain flexibility, migration facility, data security, proper maintenance and to understand project easily even after the years it is best practices to use 3 tier architecture in projects.
For small projects with 5 to 20 screens it is not necessary to implement three tier architecture. But for large projects it is recommended to use three tier implementation.
Step by step 3 tier architecture example
In this demonstration of the code we will use website as our presentation layer and class library project for both business layer and database layer.Step 1 : Create Presentation Layer
We will create a website for our presentation layer.
As you see from above code that we have successfully created a website with dotnet framework 4.0 and language c#.
In our website screen we have created a customer entry screen to add a new customer to the data base means using this screen we will see how to post data over 3 tier architecture and update it in the database.
Then we have added a gridview to the screen to display all customers from the data base means using gridview screen we will see how to fetch all records from the database and display it on screen with edit and delete options.
In the same gridview we provided two options "edit" and "delete" to edit and delete selected customer records. Kindly Note : If you want to know more about insert, update, delete and select in asp.net c# then click here to view my article.
"Edit" option provided to see how to fetch selected customer ID record from database over 3 layers. "Delete" option provided to see how to delete selected customer ID record from database over 3 layers.
So this is how our presentation layer looks like now we will create our database layer and start our coding from database layer->Business Layer->Presentation Layer.
Step 2 : Create Database Layer
In this step we will add a new project of class library to our existing project and name it as database layer.
01 | using System.Collections.Generic; |
02 | using System.Linq; |
03 | using System.Text; |
04 |
05 | namespace DatabaseLayer |
06 | { |
07 | public class clsDataLayer |
08 | { |
09 | } |
10 | } |
Step 3 : Create a connection to Data Provider
In our web application we will use SQL SERVER as our data provider so lets make a connection to sql server. For best practices we will write our sql connection string in the web config file. As we know that web config is the configuration file for web applications so if we write sql connection in that file we can access sql connection string from any file in the project.
01 | <?xml version="1.0"?> |
02 |
03 | <configuration> |
04 |
05 | <connectionStrings> |
06 | <add name="Mythreetier" connectionString="Data Source=guru\sqlexpress;Initial Catalog=ProjectBilling;Integrated Security=True" providerName="System.Data.SqlClient"/> |
07 | </connectionStrings> |
08 | |
09 |
10 | </configuration> |
To call connection string from web config file to database layer, manually we need to add references of System.Configuration to database layer references folder as shown in below image file.
We also need to import data references in the database layer file and finally calling connection string "Mythreetier" in database layer file as shown below code.
01 | using System.Collections.Generic; |
02 | using System.Linq; |
03 | using System.Text; |
04 |
05 | using System.Configuration; |
06 | using System.Data; |
07 | using System.Data.SqlClient; |
08 |
09 |
10 | namespace DatabaseLayer |
11 | { |
12 | public class clsDataLayer |
13 | { |
14 | private string conn = ConfigurationManager.ConnectionStrings["Mythreetier"].ToString(); |
15 | } |
16 | } |
Now in this step we will create methods which will execute Insert/Update/Delete command using SQLCOMMAND and another method which execute Select command using SQLCOMMAND and DATASET to load all records and pass it to business layer.
01 | using System.Collections.Generic; |
02 | using System.Linq; |
03 | using System.Text; |
04 |
05 | using System.Configuration; |
06 | using System.Data; |
07 | using System.Data.SqlClient; |
08 |
09 |
10 | namespace DatabaseLayer |
11 | { |
12 | public class clsDataLayer |
13 | { |
14 | private string conn = ConfigurationManager.ConnectionStrings["Mythreetier"].ToString(); |
15 |
16 | public void InsertUpdateDeleteSQLString(string sqlstring) |
17 | { |
18 | SqlConnection objsqlconn = new SqlConnection(conn); |
19 | objsqlconn.Open(); |
20 | SqlCommand objcmd = new SqlCommand(sqlstring, objsqlconn); |
21 | objcmd.ExecuteNonQuery(); |
22 |
23 | } |
24 |
25 | public object ExecuteSqlString(string sqlstring) |
26 | { |
27 | SqlConnection objsqlconn = new SqlConnection(conn); |
28 | objsqlconn.Open(); |
29 | DataSet ds = new DataSet(); |
30 | SqlCommand objcmd = new SqlCommand(sqlstring, objsqlconn); |
31 | SqlDataAdapter objAdp = new SqlDataAdapter(objcmd); |
32 | objAdp.Fill(ds); |
33 | return ds; |
34 | } |
35 |
36 | } |
37 | } |
Before we create methods for insert/update/delete/select sql queries let me just show you how our "customer" table structure in sql database looks like.
Now lets create methods for insert/update/delete/select sql queries as shown below.
01 | using System.Collections.Generic; |
02 | using System.Linq; |
03 | using System.Text; |
04 |
05 | using System.Configuration; |
06 | using System.Data; |
07 | using System.Data.SqlClient; |
08 |
09 |
10 | namespace DatabaseLayer |
11 | { |
12 | public class clsDataLayer |
13 | { |
14 | private string conn = ConfigurationManager.ConnectionStrings["Mythreetier"].ToString(); |
15 |
16 | public void InsertUpdateDeleteSQLString(string sqlstring) |
17 | { |
18 | SqlConnection objsqlconn = new SqlConnection(conn); |
19 | objsqlconn.Open(); |
20 | SqlCommand objcmd = new SqlCommand(sqlstring, objsqlconn); |
21 | objcmd.ExecuteNonQuery(); |
22 |
23 | } |
24 |
25 | public object ExecuteSqlString(string sqlstring) |
26 | { |
27 | SqlConnection objsqlconn = new SqlConnection(conn); |
28 | objsqlconn.Open(); |
29 | DataSet ds = new DataSet(); |
30 | SqlCommand objcmd = new SqlCommand(sqlstring, objsqlconn); |
31 | SqlDataAdapter objAdp = new SqlDataAdapter(objcmd); |
32 | objAdp.Fill(ds); |
33 | return ds; |
34 | } |
35 |
36 | public void AddNewCustomerDB(string custname, string custaddr, string custcountry, string custcity, string custincode) |
37 | { |
38 | DataSet ds = new DataSet(); |
39 | string sql = "INSERT into Customer (customer_name,customer_address,customer_country,customer_city,customer_pincode) VALUES ('" + custname + "','" + custaddr + "','" + custcountry + "','" + custcity + "','" + custincode + "')"; |
40 | InsertUpdateDeleteSQLString(sql); |
41 | } |
42 |
43 | public void UpdateCustomerDB(int custid, string custname, string custaddr, string custcountry, string custcity, string custincode) |
44 | { |
45 | DataSet ds = new DataSet(); |
46 | string sql = "Update Customer set customer_name='" + custname + "',customer_address = '" + custaddr + "',customer_country= '" + custcountry + "',customer_city = '" + custcity + "',customer_pincode = '" + custincode + "' Where customer_id = '" + custid + "' "; |
47 | InsertUpdateDeleteSQLString(sql); |
48 | } |
49 |
50 | public void DeleteCustomerDB(int custid) |
51 | { |
52 | DataSet ds = new DataSet(); |
53 | string sql = "Delete From Customer Where customer_id = '" + custid + "' "; |
54 | InsertUpdateDeleteSQLString(sql); |
55 | } |
56 |
57 |
58 | public object LoadCustomerDB() |
59 | { |
60 | DataSet ds = new DataSet(); |
61 | string sql = "SELECT * from Customer order by customer_id"; |
62 | ds = (DataSet)ExecuteSqlString(sql); |
63 | return ds; |
64 | } |
65 |
66 | } |
67 | } |
This is the complete code of database layer file as you see from above code that we have created different methods for insert/update/delete/select sql queries. Now these are the methods which will used in the business layer for customer insert, update, delete and select.
Step 5 : Create Business Layer
In this step we will add a new project of class library to our existing project and name it as business layer.
01 | using System; |
02 | using System.Collections.Generic; |
03 | using System.Linq; |
04 | using System.Text; |
05 |
06 | namespace BusinessLayer |
07 | { |
08 | public class clsBusinessLayer |
09 | { |
10 | } |
11 | } |
Step 6 : Import Datalayer Namespace in Business Layer
In this step we need to import the namespace of database layer and then create the object of class "clsDatalayer" as shown below code. To import the namespace manually we need to add database layer project references in the business layer references folder. as shown below.
After adding the references we need to create a database layer class object in the business layer class.
01 | using System; |
02 | using System.Collections.Generic; |
03 | using System.Linq; |
04 | using System.Text; |
05 | using DatabaseLayer; |
06 |
07 |
08 | namespace BusinessLayer |
09 | { |
10 | public class clsBusinessLayer |
11 | { |
12 | public clsDataLayer objDataLayer = new clsDataLayer(); |
13 | } |
14 | } |
01 | using System; |
02 | using System.Collections.Generic; |
03 | using System.Linq; |
04 | using System.Text; |
05 | using DatabaseLayer; |
06 |
07 |
08 | namespace BusinessLayer |
09 | { |
10 | public class clsBusinessLayer |
11 | { |
12 | public clsDataLayer objDataLayer = new clsDataLayer(); |
13 |
14 | public void AddNewCustomer(string custname, string custaddr, string custcountry, string custcity, string custincode) |
15 | { |
16 | objDataLayer.AddNewCustomerDB(custname, custaddr, custcountry, custcity, custincode); |
17 | } |
18 |
19 | public void UpdateCustomer(int custid, string custname, string custaddr, string custcountry, string custcity, string custincode) |
20 | { |
21 | objDataLayer.UpdateCustomerDB(custid, custname, custaddr, custcountry, custcity, custincode); |
22 | } |
23 |
24 | public void DeleteCustomer(int custid) |
25 | { |
26 | objDataLayer.DeleteCustomerDB(custid); |
27 | } |
28 |
29 | public object LoadCustomer() |
30 | { |
31 | return objDataLayer.LoadCustomerDB(); |
32 | } |
33 | } |
34 | } |
So as you see from above code that we have successfully created each methods for select/insert/delete/update i.e.
For Select : LoadCustomer();
For Insert : AddNewCustomer();
For Update : UpdateCustomer();
For Delete : DeleteCustomer();
So our business layer and datalayer is now ready to take input values from presentation layer.
If you see closely look without touching user interface we have coded our business logic and database logic so tommorow if our user interface changes from web application to mobile application then our business logic and database logic remains the same because our business layer and database layer are not coupled with user-interface layer.
So friends as you see this is one of the main advantage of using 3 tier architecture in projects because it gives you more flexibility to handle projects over a time period if any user-interface comes or any code migration happens then we can handle them easily without changing our database layer and business layer snippet only we need to re-code our user-interface pages.
Step 7 : Passing Values to Business Layer
Finally we will now code our presentation layer. First we need to reference business layer project in the website application references folder and import the namespace of business layer.
01 | using System; |
02 | using System.Collections.Generic; |
03 | using System.Linq; |
04 | using System.Web; |
05 | using System.Web.UI; |
06 | using System.Web.UI.WebControls; |
07 | using BusinessLayer; |
08 |
09 | public partial class _Default : System.Web.UI.Page |
10 | { |
11 | clsBusinessLayer objLogic; |
12 |
13 | protected void Page_Load(object sender, EventArgs e) |
14 | { |
15 | objLogic = new clsBusinessLayer(); |
16 |
17 | } |
18 | protected void GridView1_SelectedIndexChanging(object sender, GridViewSelectEventArgs e) |
19 | { |
20 |
21 | } |
22 | protected void GridView1_RowDeleting(object sender, GridViewDeleteEventArgs e) |
23 | { |
24 |
25 | } |
26 | protected void btnaddcustomer_Click(object sender, EventArgs e) |
27 | { |
28 |
29 | } |
30 | } |
Select Customer
Now lets load all the customers in the Gridview using LoadCustomer() method.
1 | clsBusinessLayer objLogic; |
2 |
3 | protected void Page_Load(object sender, EventArgs e) |
4 | { |
5 | objLogic = new clsBusinessLayer(); |
6 | GridView1.DataSource = objLogic.LoadCustomer(); |
7 | GridView1.DataBind(); |
8 |
9 | } |
As you see from above image we have displayed all customer records in the gridview using LoadCustomer() method.
Insert Customer Record
We will insert the customer record and to insert we will use AddNewCustomer() method in the button click event and pass appropriate values to it.
01 | clsBusinessLayer objLogic; |
02 |
03 | protected void btnaddcustomer_Click(object sender, EventArgs e) |
04 | { |
05 | objLogic = new clsBusinessLayer(); |
06 |
07 | if (HiddenField1.Value == "") |
08 | { |
09 | objLogic.AddNewCustomer(txtcustname.Text, txtcustaddr.Text, txtcustcountry.Text, txtcustcity.Text, txtcustincode.Text); |
10 | } |
11 |
12 | Response.Redirect("Default.aspx"); |
13 | } |
Update Customer
When the user from the screen clicks on edit link which is located on gridview then on GridView1_SelectedIndexChanging() event we have set all the values to text fields as shown below.
01 | protected void GridView1_SelectedIndexChanging(object sender, GridViewSelectEventArgs e) |
02 | { |
03 | int index = Convert.ToInt32(e.NewSelectedIndex); |
04 | txtcustname.Text = GridView1.Rows[index].Cells[3].Text; |
05 | txtcustaddr.Text = GridView1.Rows[index].Cells[4].Text; |
06 | txtcustcountry.Text = GridView1.Rows[index].Cells[5].Text; |
07 | txtcustcity.Text = GridView1.Rows[index].Cells[6].Text; |
08 | txtcustincode.Text = GridView1.Rows[index].Cells[7].Text; |
09 | HiddenField1.Value = GridView1.Rows[index].Cells[2].Text; |
10 |
11 | btnaddcustomer.Text = "Update Customer"; |
12 | } |
01 | clsBusinessLayer objLogic; |
02 |
03 | protected void btnaddcustomer_Click(object sender, EventArgs e) |
04 | { |
05 | objLogic = new clsBusinessLayer(); |
06 | if (HiddenField1.Value != "") |
07 | { |
08 |
09 | objLogic.UpdateCustomer(Convert.ToInt16(HiddenField1.Value),
txtcustname.Text, txtcustaddr.Text, txtcustcountry.Text,
txtcustcity.Text, txtcustincode.Text); |
10 | } |
11 | |
12 | Response.Redirect("Default.aspx"); |
13 | } |
When the user clicks on delete link located on gridview then on GridView1_RowDeleting() click event we have called DeleteCustomer() method to delete a record as shown in below code.
01 | clsBusinessLayer objLogic; |
02 |
03 | protected void GridView1_RowDeleting(object sender, GridViewDeleteEventArgs e) |
04 | { |
05 | objLogic = new clsBusinessLayer(); |
06 |
07 | int index = Convert.ToInt32(e.RowIndex); |
08 |
09 | int custid = Convert.ToInt16(GridView1.Rows[index].Cells[2].Text); |
10 | |
11 | objLogic.DeleteCustomer(custid); |
12 | } |
01 | using System; |
02 | using System.Collections.Generic; |
03 | using System.Linq; |
04 | using System.Web; |
05 | using System.Web.UI; |
06 | using System.Web.UI.WebControls; |
07 | using BusinessLayer; |
08 |
09 | public partial class _Default : System.Web.UI.Page |
10 | { |
11 | clsBusinessLayer objLogic; |
12 |
13 | protected void Page_Load(object sender, EventArgs e) |
14 | { |
15 | objLogic = new clsBusinessLayer(); |
16 | GridView1.DataSource = objLogic.LoadCustomer(); |
17 | GridView1.DataBind(); |
18 |
19 | } |
20 | protected void GridView1_SelectedIndexChanging(object sender, GridViewSelectEventArgs e) |
21 | { |
22 | int index = Convert.ToInt32(e.NewSelectedIndex); |
23 | txtcustname.Text = GridView1.Rows[index].Cells[3].Text; |
24 | txtcustaddr.Text = GridView1.Rows[index].Cells[4].Text; |
25 | txtcustcountry.Text = GridView1.Rows[index].Cells[5].Text; |
26 | txtcustcity.Text = GridView1.Rows[index].Cells[6].Text; |
27 | txtcustincode.Text = GridView1.Rows[index].Cells[7].Text; |
28 | HiddenField1.Value = GridView1.Rows[index].Cells[2].Text; |
29 |
30 | btnaddcustomer.Text = "Update Customer"; |
31 | } |
32 | protected void GridView1_RowDeleting(object sender, GridViewDeleteEventArgs e) |
33 | { |
34 | int index = Convert.ToInt32(e.RowIndex); |
35 |
36 | int custid = Convert.ToInt16(GridView1.Rows[index].Cells[2].Text); |
37 | |
38 | objLogic.DeleteCustomer(custid); |
39 | } |
40 | protected void btnaddcustomer_Click(object sender, EventArgs e) |
41 | { |
42 | |
43 | if (HiddenField1.Value == "") |
44 | { |
45 |
46 | objLogic.AddNewCustomer(txtcustname.Text, txtcustaddr.Text, txtcustcountry.Text, txtcustcity.Text, txtcustincode.Text); |
47 | } |
48 | else |
49 | { |
50 | objLogic.UpdateCustomer(Convert.ToInt16(HiddenField1.Value),
txtcustname.Text, txtcustaddr.Text, txtcustcountry.Text,
txtcustcity.Text, txtcustincode.Text); |
51 |
52 | } |
53 | ClearAll(); |
54 | Response.Redirect("Default.aspx"); |
55 | } |
56 |
57 | public void ClearAll() |
58 | { |
59 | txtcustname.Text = ""; |
60 | txtcustaddr.Text = ""; |
61 | txtcustcountry.Text = ""; |
62 | txtcustcity.Text = ""; |
63 | txtcustincode.Text = ""; |
64 | } |
65 | } |