Insert, Select, Update and Delete Statements
Insert, Select, Update and Delete statements these are basics of a programming because these are common coding practice which applies in development of application or a website associated with the database. Insert, Select, Update and Delete altogether also known as DML (Data Manipulation Language) statements which helps in managing the data with the database within schema objects.What is a Database?
We will not get into more detailed explanation about the database but just a breif for undertsanding.Database is a collection of data stored in a computer disc space or server space. In simple words it is a space where your data is been stored.
In a single database we can create any number of data tables. It's like a school with many classrooms and each classroom will have different school students.
In a single data table we create any number of columns For eg. studentID, studentName, studentAddress and in a single data table we can store data for specific topic.
Like to store student's records you can have students data table, For school accounts you can have accounts data table, For school results you can have results data table.
There are commonly used databases in our IT Zone
SQL - Microsoft SQL Server
Oracle - Oracle RDBMS or simply as Oracle
MYSQL - Open Source Freeware
MSACESS - Microsoft Access
PostgreSQL - ORDBMS
SAP - To manage customer relationship and other business operations
FoxPro - Database
IBM DB2 - IBM Database by IBM
Now in further we will try to understand about data manipulation statements i.e. (Insert, Select, Update and Delete).
About Data Manipulation Statements
Select Statement
Select statement let you to retrieve the data from the database table.For ex : In simple words if you want to pick up single student record, multiple student records or all students records from the table database you just need to use "Select" statement.
Example
1 | Select * from 'students' |
"students" - Data Table in a database.
Insert Statement
Insert statement lets you to insert new record or new data into the database table.For ex : In simple words if you want to add new student record then you need to use "Insert" Statement.
Example
1 | Insert into student (studentID, studentName, studentAddress) values (1, "Khadak Singh", "Mulund - Mumbai"); |
"student” - Table in a database.
Note: For numeric data we dont use (" ") inverted comma and for string data we use (" ") inverted comma .
Update Statement
Update Statement lets you to update existing one or more records in the database table depending on condition.For ex: Updating existing student records.
Example
1 | Update student set studentID=2, studentName = "Khadak Sharma", studentAddress = "Parel" Where studentID = 1; |
Delete Statement
Delete statement helps to delete one or more records from the database table depending on condition.For ex: Removing any student from a class.
Example
1 | Delete From student Where studentID = 1; |
Why Insert, Select, Update and Delete
When we have a website or an application associated with database (Sql, Oracle, Mysql and so on) then to do manipulation (i.e. Displaying, Deletion, Updating and Insertion) in the database we have to use only DML Language statements (i.e. Insert, Select, Update and Delete Statements).Now that you have understoond about data manipulation language, now let's do step by step insert, update, delete and select using asp.net c# code with ado.net objects.
Step By Step Select, Insert Update and Delete
To demonstrate step by step insert update delete and select, we will be using a simple web application, you can choose anything web or windows depending on your requirement the coding part will remain the same.Step 1
Create a web forms application

Step 2:
Create a Database
After creating a new website, create a new database from server explorer of visual studio or SQL server. We have shown you an example through visual studio 2010.

After creating a new database, let's add new data tables with colums like as shown in below image file.
Note : To create tables just click on your database name go to tables folder, when you choose to create a table it will ask you add columns. You can add your custom name column names along with data type. (Data Type : For string data choose - varchar(50) or above, for integer data choose - int)


Step 3
Adding connection string to web.config file.
First Right click on the database name then click on the properties (Alt + Enter).
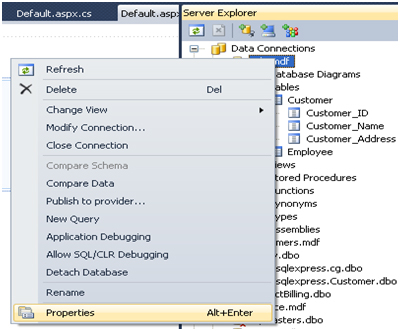
Find the connection string then copy that connection string
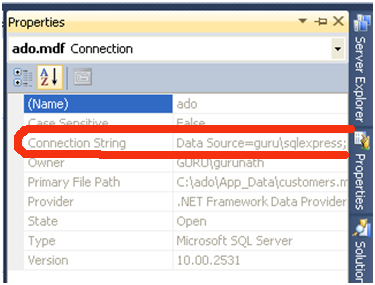
Once you have copied the connection string go to your asp.net web site solution explorer. Find the web.config file open that web.config file.
Replace the above connection string with your copied connection string.

Step 4
Add new aspx file i.e. default.aspx file to your web project.
Then
Drag and drop a gridview to the page from the tool box then do the following as shown in below.

i.e. Add - Edit Delete buttons from the command field and check on the auto generate fields. Edit link is for to choose which record to edit and delete link is for to delete the selected record.
Create a form to update and insert records into database from website as shown above i.e. Name, Address and Salary then add one hidden field and two submit buttons, name it.
Step 5
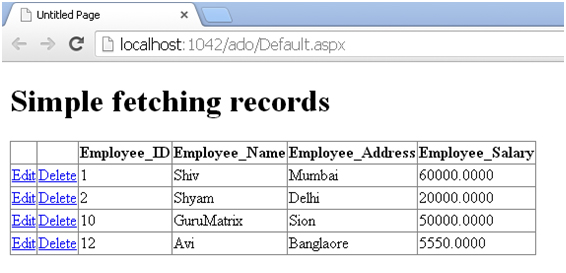
Displaying records using select statement
We will be display the records on grid view. So let’s display the records using select statement.
Open Up Connection to Database
First thing we need to open up a connection to a database. So let’s do that step by step
In default.aspx.cs file import the SQL namespaces on top .
1 | using System.Data |
2 | using System.Data.SqlClient; |
1 | string conn = ""; |
2 | conn = ConfigurationManager.ConnectionStrings["Conn"].ToString(); |
3 | SqlConnection objsqlconn = new SqlConnection(conn); |
4 | objsqlconn.Open(); |
After opening up the sql connection, Let's write the Select statement in the sql command and the execute the sql query using sql command execute reader and append it to grid view data source as shown below.
1 | objsqlconn.Open(); |
2 | SqlCommand objcmd = new SqlCommand("Select * from Employee", objsqlconn); |
3 | grd_dataset.DataSource = objcmd.ExecuteReader(); |
4 | grd_dataset.DataBind(); |
 Step 6
Inserting a new record using Insert Statement
To add new record to the database we will use the following form that we have created in our default.aspx file.

We will write insert statement in the button click event. So double click on a button, a button click event opens up.
First we need to open up the sql connection as same as previously we did it for select statement then in a sql command write the following insert statement as shown below.
1 | string conn = ""; |
2 | conn = ConfigurationManager.ConnectionStrings["Conn"].ToString(); |
3 | SqlConnection objsqlconn = new SqlConnection(conn); |
4 | objsqlconn.Open(); |
5 | SqlCommand objcmd = new SqlCommand("Insert into Employee(Employee_Name,Employee_Address,Employee_Salary) Values('" + txtName.Text + "','" + txtAddress.Text + "','" + txtSal.Text + "')", objsqlconn); |
6 | objcmd.ExecuteNonQuery(); |
txtName.Text, txtAddress.Text and txtSal.Text are the form input name to take form input data.
So just run the website by holding Ctrl + F5 and add input data in the text box finally click on add new record button to add new record to the database.
Step 7
Updating an existing record using update statement
What we did here, we have displayed the records in the grid view screen and there itself we have provided an option for edit and delete as a link as shown below.

When a user clicks on an edit link of any selected row of data then "select" query or statement fires and it display’s the records in the following form as shown below.

So for now we will assume that user clicks on the edit link and following details displayed on the screen as shown below.

So we have just clicked on 10th record and the same data appears on the screen and we have recorded the employee ID i.e. Number = 10 in our hiddenfield. If you see our form there we have a hiddenfield of employee ID.
HiddenFields: It helps us to store the important values which we can use it in the later part of coding.
This hidden field value or employee ID, I'm going to use it in an update statement for an updating purpose.
So next step when a user clicks on update button on the form, we have to fire an update statement, so fire an update statement.
1 | string conn = ""; |
2 | conn = ConfigurationManager.ConnectionStrings["Conn"].ToString(); |
3 | SqlConnection objsqlconn = new SqlConnection(conn); |
4 | objsqlconn.Open(); |
5 | SqlCommand objcmd = new SqlCommand("Update Employee set Employee_Name='" + txtName.Text + "',Employee_Address='" + txtAddress.Text + "',Employee_Salary='" + txtSal.Text + "' where Employee_Id='" + txtEmpID.Value + "'", objsqlconn); |
6 |
7 | objcmd.ExecuteNonQuery(); |
Note: In our "WHERE" condition we have passed hidden field value to employee id.
Step 8
Deleting an existing record using delete statement
What we did here, we have displayed all the records in the grid view screen and there itself for each record we have provided an option for edit and delete as a link as shown below.
So when a user clicks on the delete link of selected row, on delete link event args we have fired delete statement with following delete code as shown below.
1 | string conn = ""; |
2 | conn = ConfigurationManager.ConnectionStrings["Conn"].ToString(); |
3 | SqlConnection objsqlconn = new SqlConnection(conn); |
4 | objsqlconn.Open(); |
5 | SqlCommand objcmd = new SqlCommand("Delete from Employee Where Employee_ID='" + _empID + "'", objsqlconn); |
6 | objcmd.ExecuteNonQuery(); |
01 | protected void grd_dataset_RowDeleting(object sender, GridViewDeleteEventArgs e) |
02 | { |
03 | int index = Convert.ToInt32(e.RowIndex); |
04 | int _empID = 0; |
05 |
06 | _empID = Convert.ToInt16(grd_dataset.Rows[index].Cells[2].Text); |
07 | if (_empID != 0) |
08 | { |
09 |
10 | string conn = ""; |
11 | |
12 | conn = ConfigurationManager.ConnectionStrings["Conn"].ToString(); |
13 | SqlConnection objsqlconn = new SqlConnection(conn); |
14 | try |
15 | { |
16 |
17 | objsqlconn.Open(); |
18 | SqlCommand objcmd = new SqlCommand("Delete from Employee Where Employee_ID='" + _empID + "'", objsqlconn); |
19 | objcmd.ExecuteNonQuery(); |
20 | ClearAll(); |
21 | Response.Redirect("Default.aspx"); |
22 | |
23 |
24 |
25 |
26 | } |
27 | catch (Exception ex) |
28 | { |
29 | Response.Write(ex.Message.ToString()); |
30 | } |
31 | finally |
32 | { |
33 | objsqlconn.Close(); |
34 | } |
35 | |
36 | } |
37 | } |
Delete Procedure is same as did it for update and insert, first we need to open up sql connection, then on sql command we to just need to write a delete statement with the "Where" condition.
So my technical friend I hope that you have understood about insert, update, select and delete using asp.net c# and ado.net class object. If you have any doubts regarding this topic you can add your valuable comments. If you like this article kindly share it with your friends. Happy Coding
No comments:
Post a Comment